these tips are not for beginners and anyone under 18 requires the help of an adult. kids do not do this at home.
advanced technique for cleaning your plane.
items required;
small bottle a baby jar works(i have lots :P) with a lid
sculpting tool or a small hard blunt (no sharp knives) scraping tool
about the sice of a paint brush is good.
isoproponal available at london drugs (great for cleaning pc parts....)
Step 1
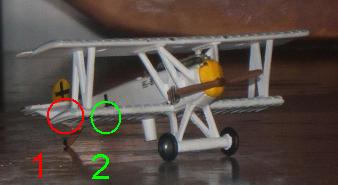
gently pop the top wing off of the biplane, some stick better then others, the top wing and struts are one
piece the glued part is attached to the bottom wing; EXCEPT the supports attached to the fuelsalage they glue
to the top wing. Go slow work one side of the supports on the plane;(1) then try the other side of the same support (2).
Continue for all support locations. Remember go slow.
advanced technique for cleaning your plane.
items required;
small bottle a baby jar works(i have lots :P) with a lid
sculpting tool or a small hard blunt (no sharp knives) scraping tool
about the sice of a paint brush is good.
isoproponal available at london drugs (great for cleaning pc parts....)
Step 1
gently pop the top wing off of the biplane, some stick better then others, the top wing and struts are one
piece the glued part is attached to the bottom wing; EXCEPT the supports attached to the fuelsalage they glue
to the top wing. Go slow work one side of the supports on the plane;(1) then try the other side of the same support (2).
Continue for all support locations. Remember go slow.
Step 2;
once the top wing is off, fill your baby jar with about 50ml of isoproponal(will call iso from now on).
put in the top wing. Let it soak for about 15-20 minutes any longer and the plastic becomes to malleable(soft and bendy)
while that is soaking, look on the bottom of your plane where the nose is attached to the fulesalage,
there should be a small gap, use the tip of your sculpting tool, gently as some planes CANNOT take the nose off until after
it soaks in iso for a couple minutes. Once this is off start cleaning some of the glue and paint off of the tip of the plane and the nose.
be careful with the propeller as they can break. Some of you may wish to replace your propeller with a small clear plastic disc to
emulate a moving prop, good luck. :P
Step 3;
take out the top wing, if you want to do this fast put in the rest of the plane now. remembering the iso should ONLY! cover
about half the plane, as you will only have enough time to clean one side before it hardens again.
now being VERY careful use your sculpting tool (blunt side) and scrape off the decals be careful of the detail. once all the decals
are off if you want you can start scraping the paint, pressure here carefully as the wing is fragile when you get to black thats the plastic.
do one side then the other top and bottom. go slow as the paint comes off a little harder then the decals BUT, after a few minutes is still malleable to come off, switch from the blunt side to the tip for getting in the groves in the detail here.
Step 4
When the wing is done it should be about time to take out the plane form the iso; now keep the iso for when you need to soak the 2nd side of the plane. scrape off all the decals. the fuelsalage is metal and comes off the fastest and easiest. including paint. use the flat of the sculpting blade on the tail to remove the decal, the paint on the tail is the hardest to remove. if your really keen on it you may wish to file it, but some planes will lose detail with the file. When all the decals are off and the fuelsalage is scraped start on the wings, go slow usuing the blunt end first, switching to
the tip to clean around the detail, this makes cleaning the wing faster. I never cleaned the struts as they have no real detail.
When done put back in the iso other side down. make some tea(no caffiene as it will make you shaky) lol... take a break or start painting the
top wing with your base color.
more to come; getting the pictures for the steps for ease of use.